Latest Entries »

Jun 30, 2010

How to Activate Payroll in Tally?

Generally Payroll is not activated in Tally. If you want to activate Payroll accounting in Tally then Press F11 to open the company features menu. Then press F1 to open Accounting Features. Finally set the field "Maintain Payroll" and "More than ONE Payroll/Cost Category" to 'yes'.


The option "More than ONE Payroll/Cost Category" is to be set yes if payroll processing is to done for multiple groups of employees.

Jun 29, 2010

What is Payroll?

Payroll : It is series of accounting transactions dealing with payment of employees for services rendered by them, after processing of various statutory requirements.

It not only just includes salaries but wages, commission, bonus, vacation allowances, sick-leave pay and value of taxable fringe benefits also. It also includes statutory deductions of money from the employees, like provident fund, employees state insurance, professional tax and so on.

The Payroll feature is very useful as it is integrated with accounting to give the user the benefits of simplified Payroll processing and accounting.

Rewriting

If some problem arises in reading the data then in that case rewriting or repairing of data is to be done. In order to rewrite or repair press Ctrl + Alt + R at Gateway of tally and select the company that is to be rewritten. Press 'y' to start rewrite.


NOTE: It is advised that a back up should be kept before rewriting as Tally drops those data which are incomplete or damaged. Tally writes the reference of dropped data in a file tally.rew, its contents can be viewed using any text editor like notepad.


Jun 28, 2010

Restore

If the data stored in your hard disk get damaged or deleted for reasons below your control. In such a sitution you can get back the data by copying back the data kept at another place through Back Up process. This process of getting back the data is known as Restoration of Data.
Restoration is possible only if you have taken back up earlier. If there is no back up, restoration is not possible. Back up is quiet an important task for all companies.

Restoration can be done in the following process:

Press Alt + F3 at Gateway of Tally to open the
Company Info menu. Then there select the option Restore. It will take you to the 'Select Companies to Restore' screen.


You will notice there that the last used Source and Destination path is displayed here.

The source field should have the full directory name from where you want to bring back the previous data. As you enter the full directory name, it will read the contents of the particular file and will then display the list of companies available.

In the Destination field mention the location on the hard disk where the company data needs to be copied back.

The companies available at the specified directory at the source field are found in the list. It means that the backup of these companies are available at the location mentioned in the Source field. There you have to select the companies you want to be restored. Then press 'y' to start restoration.

Jun 27, 2010

Back up

When we work in Tally the company data is stored in Hard Disk but for safety a copy of data should always be kept in another media like CD, Floppy, etc. The data can also be kept in Hard Disk. The process of keeping another copy of the data in another place is known as Back Up.

Go to Company Info menu from Gateway of Tally by pressing Alt + F3, select the option 'Backup' there. Then it will take you to "Select Companies to Backup" screen.


There you have to enter the following details:
  • Source : It is generally taken by default. Here the user needs to enter the full directory name where the company data is stored.
  • Destiation : Here the user has to enter the full directory name where the backup data is to be stored.
  • Name of Company : Here the user has to select the names of the company from the given list whose data is to be copied. More than one company can be selected and once the user is done with the selection, the user needs to select End of List and click on 'Yes' at Accept? to start the backup process.
  • Multi Volume Backup : When there is huge volume of data and one media is insufficient to store the complete data then Tally will prompt the user to insert second disk.
Remember that you have to mark the disks serially to maintain the sequence while restoring the backup data.

Jun 26, 2010

Creating Tally Vault for a Existing company

If Tally Vault Password is not entered at the time of company creation, it doesn't mean that the Tally Vault can no more be activated for that company. For an existing company first load the desired company then press Alt + F3 to open Company Info menu.


Then select the option Change TallyVault option. There you have to again select the company which you want to secure. Then you have to enter new Tally Vault Password and again give the same password in the field Repeat New Password.

Jun 25, 2010

Creating Tally Vault for a New Company

In order to create Tally Vault for a new company you have to enter the Tally Vault password at the company creation screen and again repeat the same in the field 'Repeat'. The password should not be the same as entered by the administrator. The Tally vaulted company will no longer be shown in the list of companies, instead of the name of the company asterisks(*) will be shown in order to denote that company.

If more than one Tally vaulted company then you have to identify the company by serial number.

Jun 24, 2010

Tally Vault

Tally Vault is another security feature in Tally. It ensures that under no circumstances the original information is available to anyone in any form. The decrypted form of data is never stored in the system so it is possible.To validate a new user without any prior knowledge of the original password it uses the 'non-stored password' mechanism. There can be only one user in Tally Vault company. It has no option to know the name of the company for which Tally Vault has been activated as it appears in asteriks.
These features show that Tally Vault becomes one of the most secure means of information storage.

Jun 22, 2010

New Features of Tally.ERP 9 Series A Release 1.81

Tally.ERP 9 Series A Release 1.81 is the latest version of Tally presently released on June 10, 2010.

New Features of Tally.ERP 9 Series A Release 1.81

New improved Licensing Experience


The licensing mechanism has been made simple, faster and comes with an improved user experience. It also includes troubleshooting connectivity issues.Licensing is enhanced broadly. The enhancements are categorized as follows:

User Experience
  • License Reactivation is now a single step process and the concept of unlocking the license file is eliminated from the software.
  • From License Activation and Reactivation, multiple menus removed.
  • Now to activate Single Site and Promo Rental license single form provided.
  • Multi Site Activation form is now available at the click of a single button.
  • Tally.ERP 9 prompts for resolution on detecting the Site or Account Administrator is attached to more than single site in case of multi-site reactivation.
  • You can now force password change on logging in to any one of the following Tally.NET Services for the first time.
  1. Update License
  2. Remote Tally.NET
  3. Surrender License
  4. Control Centre
  5. Support Centre
  • Now it is redirected to the appropriate form on attempting to activate a surrendered license or reactivate an un-activated serial number.

Troubleshooting

  • Connectivity problems detected while activating or reactivating the license of the software are provided with detailed reasons and possible solutions.
  • While establishing a connection in Educational Mode with the license server, the system detects and lists the problems. If any problem is found then the possible solutions and actions is provided.
New Service Tax features

The Service Tax feature in Tally.ERP 9 has been upgrated to handle all the functional, accounting and statutory requirements of your business in an accurate and simple manner. In this new version option have been provided to have common or Tax head specific tax ledger to account both Service Input Credit and Output Tax of all service categories. Option have been given to create common Purchase (expenses) or sales (Income) ledger to account purchase and sale of services of all categories. Now users can record Service Tax transactions in Journal or Purchase or Sales Voucher. Through Receipt Voucher and print Receipt -Cum- Challan Service Tax Billing (for professionals) can be done. Multiple services in a single voucher can be recorded through options. It supports booking of service Bills inclusive of Service Tax. In single invoice (Works Contract) both service tax related and non-service tax related services can be accounted. Cash Purchases and Sales can be recorded and printed in the name of the party by the user. Advance Receipts and adjust the advances towards the service bill can be managed in this version of Tally. Users can now record purchase of services from GTA and calculate the service tax payable for them. It provides option to record Import of services and calculate the service tax payable. It also helps in Handling exempt, export, pure agent and abatement services. It can manage advance service tax payments to Government and adjust the tax payable towards the advance. It supports the Amount deducted as TDS on Services Received are considered as realised. It also supports Service Tax Calculation in Sales or Purchase Orders. Users can now adjust Service Consideration in Journal Vouchers. Full or Partial Service Tax input credit towards Service Tax payable and CENVAT credit can be adjusted towards service tax payable. It has the facility to Record Money Equivalent Transactions. This new version has the provision to account Service Tax Opening Balance. It supports reversal of service amount with Service Tax (before realisation) and has the facility to generate G.A.R. 7 Challan.

Service Tax related reports


Under Service Tax Payables report, 4 separate reports are provided

  • Bill date wise: It displays the details of Tax payable based on Bill Date for the period selected.
  • Receipt Date wise: It displays the details of Tax payable based on Receipt Date for the period selected.
  • Tax on Service Received: It displays the details of Tax payable on services received(GTA).
  • Import of Services: It displays the details of Tax payable on services imported.
Input Credit Summary displays the details of service Input credit for the period selected.

ST 3 Form is half yearly return of Service Tax Charged and paid.


Service Tax Migration

The old Service Tax Data will be automatically updated to the new Service Tax (Data Structure).

Send information in PDF and Image (JPEG) Formats

Tally.ERP 9 now enables the user to Export or E-Mail the reports in JPEG (Image) file and PDF (Portable Document Format) formats. It ensures that the document send in this format are non-editable.
Portable Data Format (pdf) are protected from alterations using passwords and can be viewed using the Adobe Acrobat reader or a compatible reader only.
Image (JPEG) file generated supports the highest level of compression and this image file can be viewed using an image viewer and can be printed.


Index Printing for Multi Account Printing


Index Page has been provided in this version of Tally, while printing All Ledger Accounts or All Items and Group of Accounts or Group of Items from Multi Account Printing.
Now the user can print Index page in order to summarise page wise printing of Ledger Accounts or Items.

Jun 18, 2010

New Features of Tally.ERP 9 Series A Release 1.6

For Distributed Business Environments, New Data Synchronisation

To make the process simple, fast and wide-ranging, Data synchronisation is now available with new capabilities and behavioural changes in Tally. The new capabilities of Data Synchronisation will help the distributed Business Environment to get the required information on right time. The capabilities are as follows :
  • 40% to 70% performance enhanced performance achieved.
  • Send or receive vouchers from the client / server.
  • Specify the type of vouchers that you need to synchronise i.e. now you can Filter Voucher Types.
  • Synchronise after selected Voucher Types has been saved.
  • Online Snapshot can be taken.
  • Multi-level Synchronisation Support. It Supports complex hierarchy or Complicated Organisation structures
Schedule VI reports and Statutory Audit Tool for Auditor's Edition

  • For performing the Statutory Audit, Auditor's are provided a new powerful tool in this version of Tally. The tool aims at providing all the necessary tools that an auditor would need to analyse the Books of Accounts, highlight deviations, discover exceptions and generate the required Financial Statements as per Schedule VI formats.
This tool is divided into two parts:
  • Audit & Analysis which is further divided into two sections:
  1. Data Analysis
  2. Auditing
  • Financial Statements
Data Analysis

This tool provides the flexibility to load and compare the data of two years whether both the years are in same data or split data in different folders. It helps the auditor to compare the Audit Year data with the Previous Year’s data and check if there are any deviations. Investigating and highlighting specific exceptions will be helpful for the auditor in order to highlight the issues in the Books of Accounts if any. The tool approaches step by step starting from checking the Chart of Accounts, verifying the Group/Ledger Balances, conducting various Analysis to find deviations, check the statutory Payments made etc. Data Analysis constitutes of the following tools:


  • Verification of Chart of Accounts
  • Analytical Procedures
  • Pending Documents
  • Verification of Stock Items
  • Verification of Balances
  • Statutory Payments
Auditing

It provides the capability to scrutinize and Vouch the available transactions. It has been made more flexible, it has been provided to enter the audit comments on the entire data or sampled data or specific data.
In Auditing the following recommended Sampling Methods have been provided :

  • Even numbered Vouchers
  • Odd numbered Vouchers
  • Amount Range
  • Benford Analysis
  • Specific Period
  • Specified Vouchers
Financial Statements
Financial Statements can be generated as per the Schedule format specified in the Company’s act, as follows:
  • Schedule VI Profit & Loss A/c Statement
  • Schedule VI Balance Sheet
New functional features like Cut (Move), Paste (To), Undo etc. have been provided to classify or re-classify any default Tally Group or Ledger Balances to prepare or modify the above reports without effecting the Client’s data.
Quick Setup (Wizard)

This is a new feature being introduced with Tally.ERP 9. It is a Single Window Statutory Masters Configuration screen which guides the user to configure all the statutory masters (be it Accounts/Inventory/Voucher Types). It is required for the effective use of a particular statutory module.
It can be used to configure the masters for the following Statutory Modules:

  • Tax Deducted at Source (TDS)
  • Tax Collected at Source (TCS)
  • Value Added Tax (VAT)
  • Excise for Dealers
  • Excise for Manufacturers
Stock Query

In this new version of Tally, a separate button 'S' which means Stock Query has been provided to display the Stock Query Report for an item during the Voucher Creation or Alteration screen. It helps the user to check the Stock position and other information related to the specific items while creating or altering a Voucher/Invoice/Order.

Mass Emailing

A new Mass Emailing facility has been provided in this new version to help the user in order to send multiple emails to the recipients on click of a button.
  • This facility will allow the user to send Confirmation of Accounts to the Parties, Outstanding Statements or Reminder Letters to the Parties, and also send Pay Slips to all or selected Employees.
  • A separate Email Exception report has been provided in order to view and correct the Email Address details that were not entered or incorrectly entered while creating the Ledgers or Employees.
Batch Report
Now in this new version the user can view a report of the stock item for a particular batch. Here the inward and outward movement for the selected Batch is shown.

Jun 15, 2010

General Issues Resolved in Tally.ERP 9 Series A Release 1.61

Licensing
  • Tally.ERP 9 Silver was crashing while unlocking the license file on certain computers, this issue has been resolved.
  • On activating the license using the license server, Tally.ERP 9 was displaying the Error Code 81. This problem has been solved.
  • The pop-up message was not appearing when the firewall was enabled while installing Tally.ERP 9 on a 64 bit Operating System. Now this problem is not there.
  • The License Server was not starting automatically on restarting the computer with Windows 2008 Operating System even when the Start up Type is set to Automatic. This problem is solved.
Printing & Rendering

  • While printing an invoice in simple format with 5.5 inches height Tally.ERP 9 was crashing, it does not crash in this new version.
  • Tally.ERP 9 when closed by right clicking on Taskbar and using the Close option, continued to run in the background. This problem has been solved.
  • While resizing the window while previewing or printing, Tally.ERP 9 was crashing. This problem has been solved.
Support Centre

  • Select an interaction having an attachment from Ticket Number containing multiple interactions in the Zoom In content mode. From the same ticket number the contents of the previous attachment were displayed on selecting another interaction. This problem has also been solved.
Synchronisation

  • Previously the Client and Server rules exchanged all the Voucher Type Masters irrespective of the type of synchronisation on setting up synchronisation, . This problem has been solved.
  • On synchronising vouchers which contains empty VCHKEY, Tally.ERP 9 was crashing. Now it doesn't.
  • On performing Snapshot Exchange with Sync Over Slow Connection being disabled in the Client Rule only 200 vouchers were exchanged . This problem has been rectified.
  • Duplicate vouchers were created on exporting and importing data in Tally.ERP 9 Series A Release 1.52 or earlier, and on synchronising the same data using Release 1.6 the duplicate vouchers were overwritten resulting in missing vouchers. This has been resolved.
  • Tally.ERP 9 displayed an error message- Voucher Number 999 already exists during Data synchronisation between multiple locations, using an earlier release which was modified in Tally.ERP 9 Series A Release 1.6. synchronisation. This has also been resolved.
  • The relative position of cancelled vouchers were changed at the receiving end on Synchronising data. This problem has been resolved.
  • Displaying Out of Memory error in Tally.ERP 9 while performing an Exchange Snapshot Online, of acompany with large data. This has been resolved.
  • At the client and server on data synchronisation changes the position of the vouchers of Tally.ERP 9 Release 1.52 in Release 1.6. This problem has been resolved.
  • Tally.ERP 9 displays the message 'Client and Server companies have same GUID' on detecting similar GUID's at the Client and Server companies. It used to show Cannot proceed with synchronization and halts the synchronisation process.
Note: Synchronisation is not supported between two companies which are copied and pasted.
  • When the Tally.imp file was in read only mode during synchronisation Tally.ERP 9 was crashing. This problem has been resolved.
  • Tally.ERP 9 was not displaying any error message while attempting to import the data from non-existent file. Now it displays the message File not Found.

Note: Before upgrading to Tally.ERP 9 Series A Release 1.61 ensure that you have completed the synchronisation process till date in the release installed on your respective computers.

Other Enhancements of Tally.ERP 9 Series A Release 1.61

Functional Enhancements

For parties without PAN details, TDS deduction @ 20%
In case of TDS eligible payments Finance Act (2) of 2009 makes PAN compulsory , failing which tax should be deducted at the higher rate i.e. 20% effective from 1st April 2010. For deductees who have not produced PAN to the Deductor, Provision to Deduct TDS @ 20% (w.e.f. 1-4-2010) is now available.

VAT

Quick Setup displayed in Tax Ledger Setup screen for the following:
  • Regular VAT enabled Company, with the Type of Tax - Cess on VAT is introduced as a Method of Calculation for selecting the same in States where Cess is charged on sales and purchases.
  • Composite VAT enabled Company, the Type of Tax - Displaying VAT Composition in Type of Duty/Tax list in the Tax Ledger Setup.
In Voucher Type Setup section of Quick Setup, the options - F8 is for Sales and F7 to Activate Adjustment Flags in Journal are provided for easy access and configuration of the user.

The option Used in VAT Returns in case of Composite VAT enabled company, will be displayed in ledger masters grouped under Indirect Expenses or Indirect Incomes to facilitate selection of VAT or Tax Class in the ledger creation or alteration mode.

Accounting Vouchers
  • The Buyer is replaced by Customer if company has been created where Country details is set as International, then while printing Invoices the applicable change will be made.
  • Now the Item Part No is printed in a separate column while printing Invoices by enabling the option 'Print Part No' in F12 Print Configuration.
Auditors’ Edition

Statutory Audit
Auditing

  • Under Forex Transactions an additional option 'Show Bill wise details' has also been provided in the Forex Vouchers report. It will help the Auditor to view the complete information of the related Forex Vouchers.
  • Related Party Transactions – To display the Bill Wise and On Account transaction Ledger details, vouchers report has been modified for better clarity and to form the opinion.
  • When the options 'Show Audit Status' and 'Show Audit Note' are set to No at Configuration( F12 )under Verification of Vouchers the Enter Key is inactivated in all the drill down reports.
  • When more than one Party and more than one Currency are involved, the Forex Vouchers report has been enhanced to display the Vouchers in detailed mode to show all parties and exchange rates used by default.
  • The Grand Total for all the Transactions are also displayed in the reports. In the Employee Vouchers screen from Salary or Wages Payments report, F2 i.e Period button has been provided in order to display the Payroll Vouchers for the selected Employee, for a selected period.
  • During the remote access performance has been improved for all the reports available under Verification of Vouchers .
Financial Statements

  • The Debit & Credit amount column will be printed in single column while printing Schedule Summary of Financial Statement (Schedule-VI Balance Sheet and Profit & Loss A/c).
  • The Company Name will not be printed in the Amount column while printing the drill down reports from Financial Statements (Schedule-VI Balance Sheet and Profit & Loss A/c)
TDL Enhancements

Reducing Table Search Enhancement
  • Previously it was only possible to search the items in a table based on text which was matched from the starting characters of the item names and search was restricted to the first column of the table only but now it has been enhanced to Reducing Table Search.
It allows the user to narrow down the table and select item based on search criteria. The search text is matched with all part of the item names and also applies to all columns of the table.

Using the above capability the users have been delivered this product with the functionality of applying the above search technique to all the tables available in the default product. This functions availability while working will be of course found only if the configurations is properly set.

Jun 14, 2010

Latest version of Tally- Tally.ERP 9 Series A Release 1.61

Enhancements

General Enhancements
You can now extend your Tally.NET subscription from Tally.ERP 9
  • Tally.ERP 9 is provided with the capability to extend or renew Tally.NET Subscription can be done from within the product. The feature allows you to extend Tally.NET subscription well ahead of the validity period for both Single User and Multi-User editions of Tally.ERP 9. This extension of Tally.NET subscription is to be done using the TallyCurrency or Credit Card while the payment is made using a secured gateway.
Keyword search filter with Reducing List/Table
  • This new feature allows the user to search a text from any part of the name which appears in the list/table. The List in the table keeps on reducing, in order to display only those names which contains the search criteria.
For this reason the user will be able to easily search and select the required details from the filtered list. The Name based search will be display as shown below:
This search can also be performed in a List/Table containing multiple columns by providing the the necessary search keyword. e.g. search for Items, based on the Quantity.

To select the required item the Quantity based search (in the second column) to select the required item is as shown:

New Security Controls for Synchronisation

The list of Security Levels in Tally.ERP 9 contains three new categories of Security Controls for Synchronisation which have been added to this new version .
  • Client/Server Rule: The user can now Create/Alter/Delete the rules at Client/Server based on the security level assigned.
  • Synchronisation: Now the user can also perform data synchronisation based on the security level assigned.
  • Sync Reports: The user can view Synchronisation Reports based on the security level assigned.
Printing & Rendering

Tally.ERP 9 has introduced a new tab titled Version in the Tally Properties window. This tab provides additional information about tally.exe which are as follows:
  • Company: It displays the company which has developed the program file.
  • File Version: It displays the current file version used.
  • Internal Name: It displays the internal file name.
  • Language: It displays the language presently used.
  • Product Name: It displays the name of the product.
  • Product Version: It displays the current version of the product.
In order to view the Tally Properties right click on the tally.exe icon in the default Tally.ERP 9 folder.

Jun 11, 2010

How to use Security Level?

Security Control features of Tally
You need to define the various levels of security depending on the hierarchy of the accounts staff and access the right that they will have. In order to create security levels you have to do the following:
  • Press Alt + F3 at Gateway of Tally to open Company Info menu.
  • Then go to Security Control.
  • Select Types of Security.
It will take you to Security Levels screen. There you have to enter the following details:
List of Security Levels
"Data Entry" is taken here as the default level. Use down key to move to the next line and enter the name of the Security level that has to be created, say Manager. Write the name there and press enter, it will take you to another screen. You have to enter the following details there:

  • Name of Security Levels: In this field you will find that the name of manger is already displayed.
  • Use Basic Facilities: Any existing security level can be selected though the default levels are "Data Entry" and "Owner". These options are used in order to allow and disallow facilities to be used by the user. The user can access controls as per the level being provided.
  • Days Allowed for Back Dated Vouchers: Here enter the number of days the user s of the Security level will be permitted to create back dated vouchers. If you enter 1 there, it means that entry of back dated vouchers beyond the previous day is restricted.
  • Type of Access: The type of access is to be selected here from the given list. Here you have to select the type of access that has to be disallowed for this particular security level. For example- if you want that the user of this security level being created, should not be able to make any alteration then restrict the right by selecting Alter option from the list.
  • List of Reports: It is quiet similar to type of access, the only difference is that in this field you have to enter the name of the report which you don't want the user of this security level to view.
You can continue selecting the Type of Access and List of Reports one by one. After you are done, select End of List to move to the right part for re-allowing some of the disallowed facilities.

Concept of Security Levels

"Owner" is the fundamental level of security. Other default security level which is available is "Data Entry".

A few number of facilities are available to the
"Data Entry" operator.

Additional levels of security can be created with different facilities. User must be created separately as creation of a level of security does not create a user.

Jun 9, 2010

Concept of administrator

The highest authority who sets the profile of owner and other users is the administrator. The fields to be entered regarding the administrator are:

Name of administrator: Here enter the name who will control full access rights to the system. The administrator is the one who will create or alter users and specify their rights. The administrator will have access to Tally Audit, if the feature is activated.

Password: Password is to be entered of the administrator. It will be shown in "*" form.

Repeat: Here enter the password to confirm.

Jun 8, 2010

How to activate security features?

You can activate security control either during creation of a company or by alteration of a company information. For alteration press Alt + F3 at Gateway of Tally and then select Alter.

At the option 'use security control' at the company alteration screen, type 'yes'. After you enable the option it will ask you to specify the Name of Administrator(or owner) and a password. Additional users can also be created.


Security Control

The Security Control is needed to ensure secrecy of financial data, which is very important for every organisation. In case of computerized accounting the matter becomes all the most important, since, in an office the computer system is accessed by people of all hierarchy of staff. As a result this makes the data stored in the computer open to all, if no measures have been taken to restrict such free access.

Jun 5, 2010

Uploading a Report

Now a days we have seen that most of the companies have their own website and they display their audited balance sheet. This unique feature of uploading report to a website directly is provided by Tally. In order to upload a report you have to click on upload button in the respective report screen. Then the uploading screen will appear and you have to enter the following details:
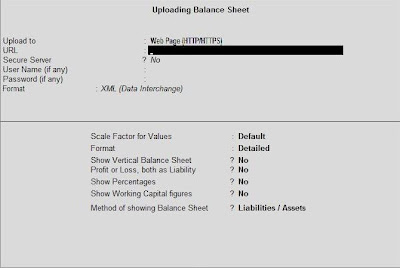
Upload To
In this field you have to select the type of server where you wish to upload the web page.

URL
At this field enter the server address where you want to upload.

Secure Server
Set 'yes' at this field if you have selected 'Web Page(HTTP/HTTPs) at the Upload To field, and if protocol if 'FPT' site, set 'No'.

Username(If any)
In this field you have to enter your username or your login name.

Password(If any)

Enter the password of the username entered in the previous field.

Format
In this field you have to select the format in which you want to upload the report from the list. You have to select the format from the given list- ASCII(comma delimited), XML(data interchange) and HTML(web publishing). For publishing the report as web page it is recommended to select HTML.

Resolution
If you have selected HTML in the Format field then select the resolution for the web page.The report will be wider when the resolution is higher and the user may scroll the report to get full view.

Destination File
At the Upload field if FTP is selected , enter the file name by which the report will be uploaded.

After you have entered all the information mentioned above you have to click on 'yes' at Upload? screen.

Jun 4, 2010

E-mailing Tally Report as Attachment

In Tally there is another way of sending a report i.e. through attaching a file . The steps to be followed to do that are as follows-
  • Go to the report and then click on print button or press Alt + P, then see whether its written with preview or not. If its written with preview the click yes or press 'y', if it is not written then press Alt + I. Then again click yes or press 'y'. It will show you the preview of how the report will be printed.
  • Press the e-mail button there or press Alt + M.
  • Then enter the details and select "As Attachment" in the field Information Sent.
When a report is send through email as an attachment, Tally creates an image of the report and a message appears by default which cannot be changed.

Jun 3, 2010

Details to be given in Mailing Screen

As you click on the E-Mail button or press Alt + M, it will take you to the mailing screen. There the following information are required to be entered:

Company email address
For this field we have to enter the company email address at the company creation or alteration screen at the option email address.

E-mail Server
Here type the email server name

From
In this option you don't have to enter anything as Tally picks up the company name from the company information master records.

From e-mail address
Tally picks up the email address from the company information.

Format
From the given list select the format. The formats available are ASCII, HTML and XML.

Resolution
This field refers to the pixels used to format the report for better display but this field is only applicable if you choose HTML format. Tally recommends to use 1024 x 768 resolution.

To E-mail address
Here you have to type the recipient's e-mail address by selecting "New Address" option.

CC to
If you want to send a copy of the e-mail to another e-mail address then type the other e-mail address.

Subject
It is already given depending upon the content being sent but it can be changed by the user.

Additional text
It can be left blank if the user want to or else the user can type the text that will appear as the first line in the message.

How to use the web enabled features of Tally?

Internet Access
The web enabled feature of Tally offers direct internet access. It means that a user can directly log on to Tally's website i.e. www.tallysolutions.com. If you want to access internet directly without opening the web sever then click on the Tally's website address displayed on the left side of the Product Info area.

E-mail
Without wasting much of a time and doing much of a manual work a user should
take advantage of this medium of communication. This means of communication is not only time saving but also reduces the cost. It helps in quick transfer of information. To use this feature you need to click on the button E-Mail which appears on the horizontal button bar or press Alt + M. This E-Mail button is not always active, it is active only in Voucher entry screens and Report screens. Then the Mailing Day Book will appear.

Web Enabled Features of Tally

Now let me tell you the some of the web enabled features of Tally which reduces more of the manual work. The web enabled features of Tally helps you to reduce paper work and enables you to send reports, invoices and orders using e-mail from Tally. As it can be send through e-mail the user need not have to send printed reports. It also helps the user to upload reports on the website.

Jun 1, 2010

How to Split Financial years?

In order to split financial year Press Alt + F3 at Gateway of Tally. It will open the company info. menu.

Select the option
Split Company Data.


Then select the company whose data is to be split.

Tally recommends the users to use a split-off-date based on the existing financial year range data of the company.Tally allows any date as the split point but it is recommended that the split point is set as the beginning of the latest financial year.

In Tally split occurs in a set of two periods. For example there are three years data in the period 01/04/2007 to 31/03/2010, for a company in Tally and you want to split them into three separate companies. Then while splitting select the beginning of the latest financial year as Tally would prompt you to do so.

After the dates are confirmed, two new companies will be created and opened on the Split Company Data Screen. First company will have the data for the period 01/04/2007 to 31/03/2009 and the second company will have the data for the period 01/04/2009 to 31/03/2010.

Activities to be done before Splitting the financial year

The following activities are to be done before splitting the financial year in Tally:
  • Ensure that all the unadjusted gains or losses have been fully adjusted by journal entries.
  • There should not be any pending Purchase bills or Sales bills. If found any then you may account them to the "Bills Pending" Account or respective party accounts.
  • It is not compulsory but it is better to keep a back up of the data which already exists.

What is Split Financial Year?

Tally is a flexible software which has limitless accounting period(not in case of educational version). It allows the entry of data for any number of years which is a tremendous benefit for the user. In cases where there is huge volume of data in the past, it causes greater overhead on the system. The Split Financial year enables you to retain most benefits and solve this overhead problem. When you split the data of a company then the following things happen:
  • For the respective split periods new companies are created.
  • Full data is retained in the original company.
Related Posts with Thumbnails

Important Links and searches

Your Ad Here